
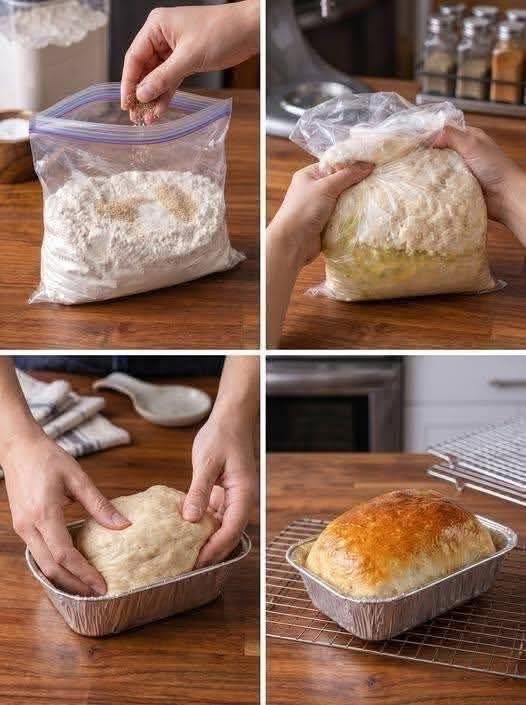
Soft, fluffy, golden, and incredibly easy to make, this viral bread-in-a-bag recipe is a fun homemade bread method that keeps the cleanup to a minimum. The dough is mixed right inside a zip-top bag, gently shaped, placed into a loaf pan, and baked until beautifully golden.
The images show a simple rustic loaf with a soft interior and golden crust, making this an excellent easy homemade bread recipe for beginners. It’s perfect for sandwiches, toast, breakfast, or serving alongside soups and family dinners.
🍞 Recipe Overview
| Category | Details |
| Recipe Name | Viral Bread in a Bag |
| Prep Time | 15 minutes |
| Rise Time | 1–1½ hours |
| Bake Time | 30–35 minutes |
| Total Time | About 2 hours |
| Yield | 1 loaf |
| Pan | 8×4-inch or 9×5-inch loaf pan |
| Oven Temperature | 375°F (190°C) |
| Difficulty | Easy |
| Texture | Soft, fluffy, tender |
| Best For | Sandwiches, toast, breakfast |
❤️ Why You’ll Love This Bread
- 🥖 Very beginner-friendly with no complicated kneading technique.
- 🧼 Minimal cleanup because the dough is mixed inside a food-safe bag.
- ☁️ Soft and fluffy inside with a beautiful golden crust.
- 🧈 Delicious with butter, jam, honey, or your favorite sandwich fillings.
- 🥪 Makes excellent homemade sandwich bread.
- ⏰ Great for weekend baking and meal preparation.
- 👨👩👧👦 A fun baking project for the whole family.
🧈 Ingredients
🍞 Easy Bread Dough
| Ingredient | Amount |
| All-purpose flour | 3 cups (360 g) |
| Active dry yeast | 2¼ tsp (1 packet) |
| Granulated sugar | 2 tbsp (25 g) |
| Salt | 1 tsp |
| Warm water | 1¼ cups (300 ml) |
| Unsalted butter, melted | 2 tbsp (28 g) |
| Vegetable oil | 1 tbsp, for the pan |
Optional Finishing
| Ingredient | Amount |
| Melted butter | 1 tbsp |
| Sesame seeds | 1 tbsp, optional |
| Rolled oats | 1 tbsp, optional |
👩🍳 Step-by-Step Instructions
1. Activate the Yeast
Pour the warm water into a measuring cup.
The water should be approximately 105–110°F (40–43°C)—warm but not hot.
Add the sugar and yeast.
Stir gently and let it stand for 5–10 minutes.
The mixture should become slightly foamy.
If your yeast is instant yeast, you can skip this activation step and mix it directly with the flour.
🥣 2. Add the Ingredients to the Bag
Use a large, food-safe gallon-size zip-top bag.
Add:
- Flour
- Salt
- Yeast mixture
- Melted butter
Seal the bag, leaving some air inside.
3. Mix the Dough
Gently squeeze and massage the outside of the bag to combine the ingredients.
Continue mixing for approximately 3–5 minutes.
The dough should become soft and slightly sticky.
If it looks extremely wet, add flour 1 tablespoon at a time.
If it seems dry or crumbly, add 1 tablespoon warm water at a time.
Important:
Don’t add too much flour. A slightly sticky dough produces softer bread.
🥖 4. Let the Dough Rise
Leave the dough inside the sealed bag.
Place it somewhere warm and draft-free for approximately 45–60 minutes.
The dough should become noticeably larger and ideally close to double in size.
A warm kitchen will speed up the process, while a cooler kitchen may require more time.
✋ 5. Remove and Shape the Dough
Lightly flour your work surface.
Carefully remove the dough from the bag.
Gently press out some of the larger air bubbles.
Shape the dough into a smooth loaf by folding the edges underneath.
Avoid aggressively kneading the dough.
The goal is simply to create a smooth shape that fits the loaf pan.
🧈 6. Prepare the Pan
Lightly grease an 8×4-inch or 9×5-inch loaf pan with vegetable oil or butter.
Place the shaped dough into the pan.
⏰ 7. Second Rise
Cover the pan loosely with a clean kitchen towel or plastic wrap.
Let the dough rise for another 25–40 minutes.
The dough should become puffy and rise noticeably above the edges of the pan.
🔥 8. Bake
Preheat your oven to 375°F (190°C).
Bake the bread for approximately 30–35 minutes.
The loaf should become beautifully golden brown.
For a more precise doneness check, the center of the loaf should reach approximately 190–200°F (88–93°C).
🧈 9. Add a Buttery Finish
Remove the bread from the oven.
While it’s still hot, brush the top with 1 tablespoon melted butter.
This gives the crust a soft, glossy finish and adds extra buttery flavor.
❄️ 10. Cool Before Slicing
Allow the bread to cool in the pan for about 10 minutes.
Then remove it from the pan and transfer it to a wire rack.
Allow it to cool for at least 30–45 minutes before slicing.
Cutting homemade bread while it’s extremely hot can compress the soft interior.
⭐ Best Tips for Perfect Bread in a Bag
Use warm—not hot—water
Water that is too hot can damage the yeast.
Don’t add excessive flour
The dough should be soft and slightly tacky. Too much flour produces a dense loaf.
Give the dough enough time to rise
The rise time depends heavily on room temperature. Watch the dough rather than relying only on the clock.
Don’t skip the second rise
The second rise helps create a lighter, softer loaf.
Don’t over-knead
This method is designed to be simple. Gentle mixing and shaping are enough.
Let the bread cool
Allowing the loaf to cool before slicing gives the crumb time to finish setting.
🌾 Best Ingredient Options
All-Purpose Flour
All-purpose flour works very well for this recipe.
Bread flour can also be used and may produce a slightly chewier loaf.
Whole-Wheat Flour
Replace up to 1 cup of the all-purpose flour with whole-wheat flour for a nuttier flavor.
Using too much whole-wheat flour without adjusting the liquid can make the bread heavier.
Butter
Melted butter gives the bread a richer flavor.
Vegetable oil can be used instead for a softer, neutral-flavored loaf.
Milk
For an extra-soft loaf, replace up to half of the water with warm whole milk.
🍞 Recipe Variations
Honey Butter Bread
Replace the sugar with 2 tablespoons honey for a subtly sweet loaf.
Garlic Herb Bread
Add 1 teaspoon garlic powder and 1 tablespoon dried Italian herbs to the flour.
Cheddar Bread
Add ¾ cup shredded cheddar cheese after the dough has formed.
Cinnamon Raisin Bread
Add 1 teaspoon cinnamon and ½ cup raisins for a sweet breakfast loaf.
Whole-Wheat Bread
Replace 1 cup of all-purpose flour with whole-wheat flour.
Sesame-Topped Bread
Brush the risen loaf lightly with water or egg wash and sprinkle sesame seeds over the top before baking.
Honey Oat Bread
Add ½ cup rolled oats to the dough and sprinkle additional oats over the top.
🥪 What to Serve With Homemade Bread
This soft bread is incredibly versatile.
For Breakfast
- Butter and honey
- Strawberry jam
- Peanut butter
- Cream cheese
- Scrambled eggs
- Avocado
For Lunch
Use it for:
- Turkey sandwiches
- Chicken sandwiches
- Tuna salad
- Grilled cheese
- Ham and cheese
- Egg salad
For Dinner
Serve warm slices alongside:
- Tomato soup
- Chicken soup
- Beef stew
- Creamy pasta
- Roasted vegetables
- Grilled chicken
⏰ Make-Ahead Instructions
You can prepare the dough ahead of time and allow it to rise slowly in the refrigerator.
After mixing, place the sealed dough in the refrigerator for up to 12–18 hours.
The next day, allow it to sit at room temperature for approximately 30–60 minutes, shape it, and let it complete its second rise before baking.
This slow rise can also develop more flavor.
🧊 Storage
Allow the bread to cool completely before storing.
Keep it in an airtight bread bag or container at room temperature.
Best quality: 2–3 days.
Avoid refrigerating homemade bread unless necessary because refrigeration can make the crumb become stale more quickly.
🔥 Reheating
For a warm slice, place it in the microwave for approximately 8–12 seconds.
You can also warm several slices in a 300°F (150°C) oven for about 5–8 minutes.
For a crispier crust, toast individual slices in a toaster.
❄️ Freezing
Homemade bread freezes very well.
Once completely cool, wrap the whole loaf tightly in plastic wrap and place it inside a freezer-safe bag.
Alternatively, slice the bread first so you can remove individual slices as needed.
Freeze for up to 2–3 months for the best quality.
Thaw at room temperature and toast if desired.
⚠️ Common Mistakes to Avoid
Using hot water
Extremely hot water can interfere with yeast activity.
Using an undersized bag
The dough needs plenty of room to expand during the first rise.
Sealing the bag too tightly
Leave enough space for the dough to expand.
Adding too much flour
A stiff dough leads to heavier bread.
Skipping the second rise
This can result in a dense loaf.
Slicing immediately
Fresh bread needs time to cool and set.
Using a non-food-safe plastic bag
Always use a clean bag specifically intended for food storage.
📊 Nutrition Estimate
Approximate values per slice, assuming 12 slices:
| Nutrient | Estimated Amount |
| Calories | 170–190 kcal |
| Carbohydrates | 28–31 g |
| Protein | 4–5 g |
| Fat | 5–6 g |
| Saturated Fat | 2–3 g |
| Sugar | 2–3 g |
| Fiber | 1 g |
| Sodium | 190–220 mg |
Nutrition values are estimates and do not include optional toppings or spreads.
❓ Frequently Asked Questions
Can I really mix bread dough in a plastic bag?
Yes, using a food-safe, sturdy zip-top bag can be a convenient way to mix the dough and reduce cleanup. Don’t use thin bags that aren’t intended for food contact.
Why is my dough sticky?
Bread dough naturally becomes somewhat sticky, especially before gluten develops. Avoid adding large amounts of flour. Lightly flour your hands or work surface instead.
How do I know when the bread has finished rising?
The dough should look noticeably puffy and approximately double in size during the first rise. For the second rise, it should rise visibly above the rim of the loaf pan.
Why did my bread turn out dense?
Common causes include inactive yeast, insufficient rising time, too much flour, or water that was too hot or too cold.
Can I use instant yeast?
Yes. Instant yeast can be mixed directly with the flour, although you can also dissolve it in warm water first.
Can I make this bread with whole-wheat flour?
Yes. Start by replacing about 1 cup of the all-purpose flour with whole-wheat flour. You may need a little additional water because whole-wheat flour absorbs more liquid.
Can I bake this in a disposable aluminum pan like the one shown?
Yes. A small disposable aluminum loaf pan can work well. Place it on a sturdy baking sheet for easier handling and stability.
✨ Final Thoughts
This Viral Bread in a Bag is a fun and surprisingly simple way to make fresh homemade bread with minimal cleanup. The dough comes together easily, rises until beautifully puffy, and bakes into a golden loaf with a soft, fluffy center.
Whether you’re new to bread baking or simply looking for an easy homemade bread recipe for sandwiches and breakfast, this method is worth trying.
Serve it warm with butter and honey, turn it into sandwiches, or toast thick slices for a comforting breakfast. Nothing beats the smell of freshly baked bread coming from your own kitchen. 🍞🧈✨