
Introduction
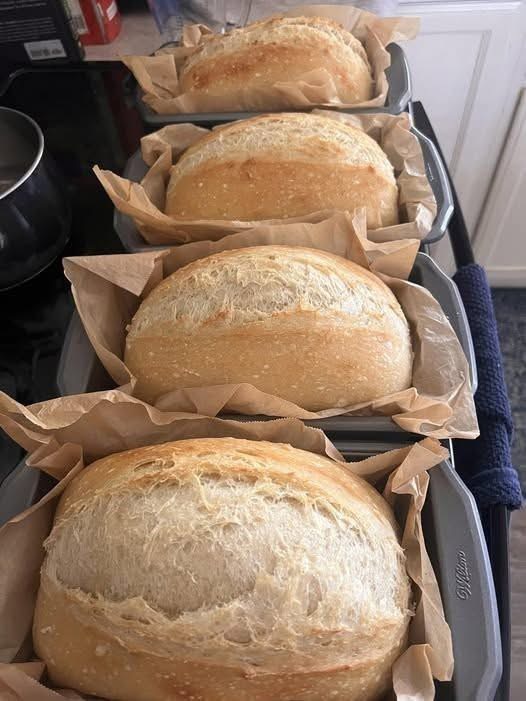
Nothing compares to the smell of freshly baked homemade bread filling your kitchen. These Homemade Artisan White Bread Loaves have a beautifully golden crust, a soft and fluffy interior, and an attractive rustic appearance with a signature split across the top. Made with simple pantry ingredients, this recipe is perfect for creating bakery-style bread at home without complicated techniques or expensive equipment.
Whether you serve thick slices with butter, prepare sandwiches for the family, or pair a warm loaf with homemade soup, these versatile white bread loaves are delicious for almost any occasion. The dough is easy to work with, and the recipe can be prepared in multiple loaf pans, just like the four beautiful loaves shown in the image. With the right rising time and a few simple baking tips, you can enjoy fresh homemade bread with a tender crumb and a satisfying golden crust.
📋 Recipe Overview
| Recipe Detail | Information |
| Prep Time | 25 minutes |
| First Rise | 60–90 minutes |
| Second Rise | 30–45 minutes |
| Bake Time | 30–35 minutes |
| Total Time | Approximately 2½–3 hours |
| Yield | 4 medium loaves |
| Servings | 32–40 slices |
| Pan Size | Four 8½ × 4½-inch loaf pans |
| Oven Temperature | 375°F (190°C) |
| Difficulty | Easy to moderate |
| Texture | Soft, fluffy interior with a golden crust |
| Flavor | Mild, buttery, classic white bread |
❤️ Why You’ll Love This Recipe
- Soft and fluffy texture: The dough produces tender bread with a fine, even crumb.
- Beautiful golden crust: A hot oven creates an appetizing crust with a rustic split along the top.
- Simple ingredients: Flour, yeast, water, sugar, salt, and fat are all you need for a basic loaf.
- Perfect for sandwiches: The slices are sturdy enough for breakfast toast, packed lunches, and everyday sandwiches.
- Great for batch baking: Four loaves are ideal for large families, gatherings, or stocking the freezer.
- Beginner-friendly: The straightforward mixing, kneading, and rising process makes this a practical homemade bread recipe.
- Easy to customize: Add herbs, seeds, whole-wheat flour, or a little extra butter to suit your preferences.
🛒 Ingredients
The following recipe makes four medium loaves similar in size to those shown in the photograph.
Main Bread Dough
| Ingredient | Quantity |
| All-purpose flour or bread flour | 12 cups (approximately 1.44–1.56 kg) |
| Warm water | 5 cups (1.18 liters) |
| Active dry yeast | 2 tablespoons |
| Granulated sugar | ¼ cup (50 g) |
| Salt | 1 tablespoon |
| Vegetable oil or melted unsalted butter | ¼ cup (60 ml) |
| Additional flour for kneading | As needed |
| Oil for greasing bowls and pans | As needed |
Important: Flour absorbs water differently depending on the brand, humidity, and measuring method. Begin with about 11½ cups of flour, then add the remaining flour gradually until the dough is soft and slightly tacky. You may not need every last spoonful.
Optional Ingredients for a Softer Crust
| Ingredient | Quantity | Purpose |
| Milk | Replace up to 1 cup of the water | Adds richness |
| Unsalted butter | 2 tablespoons, melted | Adds flavor and tenderness |
| Milk or butter for brushing | 1–2 tablespoons | Creates a softer, more tender crust |
| Sesame seeds or rolled oats | 1–2 tablespoons per loaf | Adds texture and decoration |
👩🍳 Step-by-Step Instructions
Step 1: Activate the Yeast
- Pour approximately 1 cup of the warm water into a large mixing bowl.
- Add the sugar and active dry yeast.
- Stir gently until combined.
- Leave the mixture for 5–10 minutes.
The yeast should become foamy or bubbly on the surface, indicating that it is active.
The water should be comfortably warm, around 100–110°F (38–43°C). Water that is too hot can damage the yeast.
If you are using instant yeast, you can mix it directly with the flour and proceed with the recipe.
Step 2: Mix the Dough
- Add the remaining warm water to the activated yeast.
- Stir in the vegetable oil or melted butter.
- Add approximately 11½ cups of flour and the salt.
- Mix with a wooden spoon or sturdy spatula until a rough dough forms.
- Add more flour gradually if the dough is excessively wet.
The dough should be soft and slightly tacky, but it should not resemble a liquid batter.
Avoid adding too much flour at this stage. A stiff dough can produce heavy bread instead of the light, fluffy texture you’re aiming for.
Step 3: Knead Until Smooth
- Transfer the dough to a lightly floured work surface.
- Knead by pushing the dough away with the heel of your hand, folding it back, and turning it.
- Continue kneading for approximately 8–10 minutes by hand.
Alternatively, knead with a stand mixer fitted with a dough hook for approximately 5–7 minutes on low to medium-low speed.
The dough is ready when it becomes smooth, elastic, and more cohesive. It should stretch slightly without tearing immediately.
If it sticks excessively to your hands, add flour one tablespoon at a time rather than adding a large amount all at once.
Step 4: Let the Dough Rise
- Lightly grease a large bowl with oil.
- Place the dough inside and turn it once to coat the surface.
- Cover the bowl with plastic wrap or a clean kitchen towel.
- Leave it in a warm, draft-free place for approximately 60–90 minutes.
The dough should roughly double in size, although the exact timing depends on the temperature of your kitchen.
A slower rise can improve flavor, so avoid placing the dough directly beside a hot oven or another strong heat source.
Step 5: Divide the Dough Into Four Portions
- Gently press the dough to release some of the larger air bubbles.
- Transfer it to a lightly floured surface.
- Divide it into four equal portions.
For the most consistent loaves, weigh the entire dough and divide the weight by four.
Cover the unused portions with a clean towel while shaping the first loaf to prevent the dough from drying out.
Step 6: Shape the Loaves
- Take one portion of dough and gently flatten it into a rectangle.
- Fold the top edge toward the center and press lightly to seal.
- Fold the bottom edge upward and press again.
- Roll the dough into a log, pinching the final seam closed.
- Tuck the ends under slightly to create a neat loaf shape.
Repeat with the remaining portions.
Place each loaf seam-side down into a lightly greased 8½ × 4½-inch loaf pan.
For a more rustic appearance like the bread in the image, you can bake the loaves in appropriately sized oven-safe loaf pans or use parchment-lined baking trays if you prefer free-form loaves. Allow enough space between free-form loaves for expansion.
Step 7: Allow the Second Rise
- Cover the shaped loaves loosely with a clean towel or lightly greased plastic wrap.
- Leave them in a warm place for approximately 30–45 minutes.
- Check that the dough has become noticeably puffy.
The dough should rise toward or slightly above the rim of the loaf pans, depending on the pan size and shaping.
Avoid letting the loaves overproof. If the dough rises too much, it may collapse or spread during baking.
Step 8: Score the Tops
- Preheat the oven to 375°F (190°C).
- Use a sharp bread lame or razor blade to make one shallow lengthwise slash across the top of each loaf.
- Aim for a cut approximately ¼ inch (6 mm) deep.
Scoring gives the dough a controlled place to expand in the oven, helping create the attractive split visible on the loaves.
If you prefer a smoother top, you can skip scoring, although the finished appearance will be different.
Step 9: Bake Until Golden
- Place the loaf pans on the center oven rack.
- Bake for approximately 30–35 minutes.
- Rotate the pans if your oven has noticeable hot spots.
- Check that the crust is golden brown and the loaves sound slightly hollow when tapped.
For a reliable doneness check, the center of the bread should reach approximately 190–200°F (88–93°C).
If the tops become too dark before the bread is fully baked, loosely cover them with foil for the remaining baking time.
Because four loaves occupy more oven space than one, baking time may vary slightly depending on your oven and the arrangement of the pans.
Step 10: Cool the Loaves
- Remove the pans from the oven using oven mitts.
- Let the bread rest in the pans for approximately 5–10 minutes.
- Carefully turn the loaves out onto wire cooling racks.
- Allow them to cool for at least 45–60 minutes before slicing.
Cooling allows the interior to finish setting and helps prevent a gummy texture.
For a softer crust, brush the tops lightly with melted butter immediately after baking.
Step 11: Slice and Serve
Use a serrated bread knife to cut the cooled loaves into even slices.
Serve with butter, jam, honey, scrambled eggs, or your favorite sandwich fillings.
Fresh homemade bread is especially delicious on the day it is baked, when the crust is fragrant and the interior remains soft.
⭐ Best Tips for Perfect Homemade Bread
Measure Flour Carefully
Too much flour is one of the most common reasons homemade bread turns out dry or dense. A kitchen scale provides the most consistent results.
Use Fresh Yeast
If the yeast mixture does not become bubbly after 5–10 minutes, check the yeast’s expiration date and water temperature before continuing.
Knead Thoroughly
Proper kneading develops gluten, which helps the bread rise and retain its shape.
Avoid Over-Flouring
The dough should be slightly tacky. Adding too much flour can make it difficult for the loaves to rise properly.
Give the Dough Enough Time
Rising time depends on temperature, so watch the dough rather than relying only on the clock.
Shape With a Tight Surface
Creating a neat, sealed loaf helps it rise evenly and improves its final appearance.
Score With a Sharp Blade
A clean slash helps direct oven expansion and creates a defined split along the top.
Avoid Opening the Oven Too Early
Frequent opening during the first part of baking can reduce oven temperature and interfere with the bread’s rise.
Cool Before Cutting
Fresh bread may smell irresistible, but slicing too early can compress the crumb and make it seem underbaked.
🌾 Best Ingredient Options
| Ingredient | Alternative | Result |
| All-purpose flour | Bread flour | Slightly chewier bread |
| Active dry yeast | Instant yeast | Convenient mixing |
| Vegetable oil | Olive oil | Subtle fruity flavor |
| Vegetable oil | Melted butter | Richer taste and tenderness |
| Water | Whole milk | Softer, richer crumb |
| Granulated sugar | Honey | Mild sweetness |
| White flour | Partial whole-wheat flour substitution | Heartier flavor |
| Fine salt | Sea salt | Similar seasoning |
| Plain topping | Sesame seeds or oats | Added texture |
For a whole-wheat variation, replace up to 2–3 cups of the white flour with whole-wheat flour to start. You may need a little extra water, and the finished bread will be denser than an all-white-flour loaf.
🔄 Recipe Variations
1. Buttery White Bread
Replace the vegetable oil with melted unsalted butter. The finished loaves will have a richer flavor and a tender crumb.
2. Honey White Bread
Replace the granulated sugar with ¼ cup honey. Add it to the liquid ingredients before mixing.
Honey encourages browning, so keep an eye on the crust toward the end of baking.
3. Garlic Herb Bread
Add 2 teaspoons of Italian seasoning and 2 finely minced garlic cloves to the dough.
This savory version pairs beautifully with pasta, soups, and roasted meats.
4. Whole-Wheat White Bread Blend
Replace 2–3 cups of the all-purpose flour with whole-wheat flour. Add water gradually until the dough reaches the correct consistency.
5. Seeded Bread
Brush the shaped loaves with a little water or milk and sprinkle with sesame seeds, sunflower seeds, or rolled oats before the second rise.
6. Soft Sandwich Bread
Use milk for part of the water and add 2 tablespoons of butter. Brush the baked loaves with butter and allow them to cool completely.
This creates a softer crust that works particularly well for sandwiches.
7. Herb and Parmesan Bread
Add ½ cup finely grated Parmesan and 1 teaspoon dried rosemary to the dough. This variation has a savory flavor that works well with soups and salads.
8. Mini Bread Loaves
Divide the dough into smaller portions and place them in mini loaf pans. Begin checking for doneness earlier because smaller loaves bake faster.
🍽️ What to Serve With Homemade White Bread
| Serving Idea | Why It Works |
| Butter and jam | A simple breakfast or snack |
| Scrambled eggs | A satisfying breakfast combination |
| Chicken noodle soup | Perfect for dipping |
| Beef stew | Helps soak up the rich gravy |
| Creamy garlic chicken pasta | Complements the savory sauce |
| Grilled cheese sandwiches | Soft bread with a crisp, buttery exterior |
| Tuna or chicken salad | Ideal for quick lunches |
| Roasted chicken | A classic family dinner pairing |
| Fresh tomato and mozzarella | A light, flavorful combination |
| Honey or cinnamon butter | A delicious sweet treat |
⏰ Make-Ahead Instructions
Prepare the Dough the Night Before
- Prepare the dough and knead until smooth.
- Place it in a lightly oiled bowl.
- Cover tightly and refrigerate rather than leaving it to rise for many hours at room temperature.
- The next day, allow the dough to warm slightly, then divide, shape, proof, and bake.
Cold fermentation slows yeast activity, making it easier to prepare the dough in advance.
Bake the Bread Ahead of Time
Bake the loaves completely and allow them to cool. Store them at room temperature for short-term use or freeze them for longer storage.
For the freshest texture, refresh a previously baked loaf in a 350°F (175°C) oven for approximately 8–12 minutes before serving.
🧊 Storage Instructions
Room-Temperature Storage
- Allow each loaf to cool completely.
- Store it in a bread box or a sealed bread bag.
- Keep it in a cool, dry place away from direct sunlight.
- Enjoy within approximately 2–3 days for the best quality.
A sealed bag helps retain softness, although it may soften the crust.
Refrigerator Storage
Refrigeration is generally not recommended for plain homemade bread because it can cause the crumb to become stale more quickly.
For longer storage, freezing is usually a better option.
❄️ Freezing Instructions
Since this recipe makes four loaves, freezing is an excellent way to keep extra bread fresh.
Freeze Whole Loaves
- Cool the bread completely.
- Wrap each loaf tightly in plastic wrap or foil.
- Place it in a freezer-safe bag.
- Label with the date.
- Freeze for up to 3 months for best quality.
Freeze Individual Slices
- Allow the bread to cool completely.
- Slice it into your preferred thickness.
- Place parchment paper between slices if desired.
- Transfer the slices to freezer-safe bags.
- Freeze flat for easy storage.
Individual slices can be toasted directly from frozen.
Thawing Instructions
For a whole loaf, thaw at room temperature while wrapped. Remove the wrapping and warm the bread in a 350°F (175°C) oven for approximately 8–12 minutes.
For individual slices, use a toaster or warm them in the oven until heated through.
🔥 Reheating Instructions
Oven Method
- Preheat the oven to 350°F (175°C).
- Place the loaf on a baking sheet.
- Heat for 8–12 minutes, depending on the size.
- Remove when the crust is refreshed and the center is warm.
Toaster Method
Toast individual slices until they reach your preferred level of crispness. This is ideal for breakfast or quick snacks.
Skillet Method
- Heat a skillet over medium-low heat.
- Add a small amount of butter if desired.
- Toast each slice for 1–2 minutes per side.
This creates a crisp, buttery surface while keeping the inside soft.
⚠️ Common Mistakes to Avoid
| Mistake | How to Avoid It |
| Adding too much flour | Add it gradually and keep the dough slightly tacky |
| Using water that is too hot | Keep the water around 100–110°F (38–43°C) when activating active dry yeast |
| Using inactive yeast | Check that the yeast becomes bubbly before continuing |
| Kneading too little | Knead until the dough becomes smooth and elastic |
| Allowing insufficient rising time | Wait until the dough visibly expands and becomes puffy |
| Letting the dough overproof | Bake when the loaves are properly risen rather than waiting indefinitely |
| Shaping loosely | Seal the seams and create a neat loaf shape |
| Forgetting to score | Make a shallow slash to help control oven expansion |
| Baking at the wrong temperature | Preheat the oven and use an oven thermometer if necessary |
| Cutting bread while hot | Allow the loaves to cool for at least 45–60 minutes |
| Storing bread while warm | Cool completely before packaging |
| Freezing bread without wrapping | Use airtight freezer-safe packaging to prevent freezer burn |
📊 Nutrition Estimate
The following figures are approximate estimates for one slice, assuming the recipe produces four loaves with about 8–10 slices per loaf.
| Nutrient | Estimated Amount Per Slice |
| Calories | 130–170 kcal |
| Protein | 4–5 g |
| Total Fat | 2–4 g |
| Saturated Fat | 0.5–1.5 g |
| Carbohydrates | 24–31 g |
| Fiber | 1–2 g |
| Sugars | 1–3 g |
| Sodium | 220–350 mg |
Actual nutrition depends on the flour brand, final loaf size, slice thickness, and whether you use oil, butter, or milk.
❓ Frequently Asked Questions
Why didn’t my bread rise?
Inactive yeast, water that is too hot, or a cool room can prevent the dough from rising properly. Check the yeast’s freshness and allow additional time if the kitchen is cold.
Can I use instant yeast instead of active dry yeast?
Yes. Instant yeast can be mixed directly with the flour. Follow the package instructions and watch the dough’s appearance to determine when it has risen enough.
Can I make this recipe with all-purpose flour?
Yes. All-purpose flour makes delicious homemade white bread. Bread flour may produce a slightly chewier texture because it typically contains more protein.
Why is my homemade bread dense?
Common causes include adding too much flour, insufficient kneading, inadequate rising time, or cutting the loaf before it has cooled.
How do I get a golden crust like the bread in the image?
Bake the loaves in a properly preheated oven at 375°F (190°C). Make a shallow slash across each loaf before baking and allow the crust to develop a golden-brown color.
Should I brush the loaves with butter?
It is optional. Brushing with melted butter after baking gives the crust a softer texture and a richer flavor. Leaving the bread unbrushed helps preserve a firmer crust.
Can I bake all four loaves at once?
Yes, provided your oven has enough space for proper air circulation. Leave space between the pans and rotate them if necessary. If your oven is small, bake in batches for more even results.
Can I use loaf pans of a different size?
Yes, but the dough portions and baking time may need adjustment. Avoid overfilling the pans; the dough should have enough space to expand during the second rise and baking.
How can I tell when the bread is fully baked?
The crust should be golden brown, the loaf should sound slightly hollow when tapped, and the center should reach approximately 190–200°F (88–93°C).
Can I make the dough without a stand mixer?
Absolutely. A large bowl, wooden spoon, and clean work surface are sufficient. Knead the dough by hand for approximately 8–10 minutes.
How long does homemade white bread stay fresh?
It is generally best within 2–3 days when stored properly at room temperature. Freeze extra loaves if you want to keep them longer.
Can I freeze the bread after baking?
Yes. Cool the loaves completely, wrap them securely, and freeze for up to 3 months for best quality.
🍞 Final Thoughts
These Homemade Artisan White Bread Loaves are a wonderful way to enjoy fresh, soft, golden bread straight from your own kitchen. With their fluffy interiors, attractive crusts, and versatile flavor, they are ideal for everyday sandwiches, breakfast toast, family dinners, and special gatherings.
The secret to success is simple: measure the flour carefully, knead until the dough is elastic, allow enough time for both rises, and bake until the loaves are fully cooked. Make all four loaves for a large family meal or freeze the extras for later. Once you experience the taste and aroma of freshly baked homemade bread, this recipe may become a regular favorite in your kitchen.