
Introduction
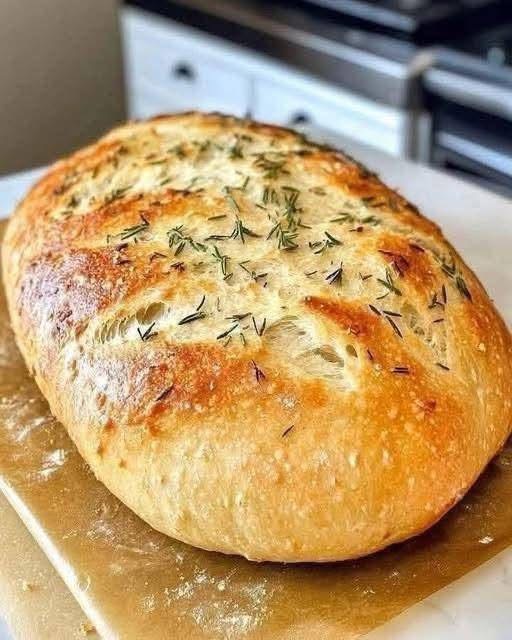
This Rustic Garlic Herb Dutch Oven Bread features a beautifully golden, crusty exterior and a soft, airy interior filled with delicious homemade flavor. Infused with fragrant garlic and fresh herbs, this artisan-style bread is perfect for anyone who loves the taste and texture of bakery-fresh bread. Baking it in a Dutch oven helps trap steam during the initial baking stage, creating a crisp crust while keeping the inside tender and moist.
Whether you’re serving it alongside a comforting soup, pairing it with a creamy pasta dinner, or enjoying a warm slice with butter, this homemade garlic herb bread is a wonderful addition to your table. The dough requires only a few basic ingredients, and with enough resting time, you can create a beautiful rustic loaf without complicated kneading techniques. It’s ideal for family dinners, weekend baking, holiday gatherings, and anyone who enjoys fresh homemade artisan bread.
📋 Recipe Overview
| Recipe Detail | Information |
| Prep Time | 15 minutes |
| Rise Time | 8–18 hours |
| Second Rise | 45–60 minutes |
| Bake Time | 40–45 minutes |
| Total Time | Approximately 9–20 hours |
| Yield | 1 large loaf |
| Servings | 8–10 slices |
| Cuisine | Rustic European-Inspired |
| Course | Bread, Side Dish |
| Difficulty | Easy |
| Baking Method | Dutch oven |
| Oven Temperature | 450°F (230°C), then 425°F (220°C) |
| Texture | Crusty outside, soft and airy inside |
| Flavor | Savory garlic, fragrant herbs, and mild olive oil |
❤️ Why You’ll Love This Recipe
1. A Beautifully Crispy Crust
Baking the loaf in a covered Dutch oven creates a steamy environment that helps develop a golden, crackly crust.
2. Soft and Airy Interior
A long fermentation gives the dough time to develop flavor and an open, tender crumb.
3. Delicious Garlic and Herb Flavor
Fresh garlic, rosemary, and thyme add a savory aroma that makes every slice taste special.
4. Minimal Kneading Required
This rustic bread uses a simple mixing method, making it approachable even for beginner bakers.
5. Perfect for Family Meals
Serve it with soups, stews, pasta, roasted vegetables, or your favorite homemade dinner.
6. Excellent for Entertaining
A whole rustic loaf makes an attractive centerpiece for a dinner table or bread basket.
7. Easy to Customize
Use rosemary, thyme, parsley, or Italian seasoning to create your preferred flavor combination.
🛒 Ingredients
Bread Dough
| Ingredient | Quantity |
| All-purpose flour or bread flour | 3 cups (360–390 g) |
| Lukewarm water | 1½ cups (355 ml) |
| Instant yeast | ¼ teaspoon |
| Fine salt | 1½ teaspoons |
| Olive oil | 1 tablespoon |
| Fresh rosemary, finely chopped | 1 tablespoon |
| Fresh thyme leaves | 1 teaspoon |
| Garlic, finely minced | 2–3 cloves |
Optional Garlic Herb Topping
| Ingredient | Quantity |
| Olive oil or melted butter | 1 tablespoon |
| Fresh rosemary, chopped | 1 teaspoon |
| Fresh thyme | ½ teaspoon |
| Flaky sea salt | A small pinch |
| Garlic powder | ¼ teaspoon, optional |
Note: These quantities create a flavorful garlic herb variation of a classic no-knead artisan loaf. The image shows a rustic loaf topped with herbs, but its exact original ingredients cannot be confirmed from the photograph.
Ingredient Tips
Flour: Bread flour creates a slightly chewier texture, while all-purpose flour produces a tender loaf. Both work well.
Water: Use lukewarm water, approximately 85–100°F (29–38°C). Very hot water can damage the yeast.
Yeast: A small amount of instant yeast works well for a long overnight rise. The dough should gradually become bubbly and increase in volume.
Garlic: Fresh minced garlic gives the bread a stronger savory flavor. For a milder taste, use roasted garlic or reduce the quantity.
Rosemary: Fresh rosemary gives the loaf its characteristic rustic appearance and fragrant flavor. Chop it finely so the pieces distribute evenly.
Olive oil: A little olive oil adds flavor and helps keep the crumb tender.
👩🍳 Step-by-Step Instructions
Step 1: Combine the Dry Ingredients
- Add the flour, instant yeast, and salt to a large mixing bowl.
- Whisk briefly to distribute the ingredients evenly.
- Stir in the chopped rosemary, thyme, and minced garlic.
Keep the salt and yeast distributed throughout the flour rather than placing them in direct contact for an extended period before mixing.
Step 2: Add the Water and Olive Oil
- Pour the lukewarm water into the flour mixture.
- Add the olive oil.
- Stir with a wooden spoon or sturdy spatula until a rough, sticky dough forms.
- Scrape the sides of the bowl to incorporate any remaining dry flour.
The dough should look rough and slightly sticky rather than smooth. Avoid adding too much extra flour, as this can make the finished bread dense.
Step 3: Let the Dough Rise
- Cover the bowl tightly with plastic wrap or a lid.
- Leave it at room temperature for approximately 8–18 hours.
- Check that the dough has expanded, developed bubbles, and become noticeably airy.
The exact rising time depends on room temperature. A warm kitchen speeds up fermentation, while a cooler kitchen slows it down.
The dough should look lively and well risen, but it should not be left so long that it collapses completely.
Step 4: Shape the Loaf
- Lightly flour a clean work surface.
- Gently scrape the dough onto the surface.
- With lightly floured hands, fold the edges toward the center several times.
- Turn the dough seam-side down.
- Gently shape it into a round or oval loaf.
Avoid pressing out all the air. The goal is to create a reasonably tight surface while preserving the gas developed during fermentation.
Step 5: Allow a Second Rise
- Place the shaped dough on a piece of parchment paper.
- Cover loosely with a clean kitchen towel.
- Allow it to rest for approximately 45–60 minutes.
The dough should become slightly puffier. It does not need to double in size during this second rise.
Meanwhile, preheat the oven and Dutch oven as described in the next step.
Step 6: Preheat the Dutch Oven
- Place a covered Dutch oven inside your oven.
- Preheat to 450°F (230°C) for approximately 30 minutes.
- Use heavy-duty oven mitts when handling the hot pot.
A thoroughly preheated Dutch oven helps the dough begin baking immediately and encourages a crisp, well-developed crust.
Safety tip: Check that your Dutch oven and its lid can safely withstand the chosen oven temperature. Remove any plastic or non-oven-safe components.
Step 7: Score the Dough
- Carefully remove the hot Dutch oven from the oven and place it on a heat-resistant surface.
- Lift the dough using the parchment paper and lower it into the pot.
- Using a sharp bread lame or razor blade, make one shallow slash across the top.
- If desired, brush the surface lightly with olive oil and sprinkle on a little extra rosemary and thyme.
Scoring allows the loaf to expand in a controlled way as it bakes. Keep your hands away from the hot sides of the pot.
Step 8: Bake the Bread Covered
- Put the lid on the Dutch oven.
- Return it to the oven.
- Bake at 450°F (230°C) for 25–30 minutes.
The covered environment traps steam released by the dough, helping the loaf expand before the crust becomes firm.
Step 9: Finish Baking Uncovered
- Carefully remove the lid.
- Reduce the oven temperature to 425°F (220°C).
- Continue baking for another 10–15 minutes, or until the crust is deep golden brown.
For a more reliable doneness check, the center of the loaf should reach approximately 200–210°F (93–99°C).
If the surface browns too quickly, reduce the temperature slightly and continue baking until the center is fully cooked.
Step 10: Cool Before Slicing
- Carefully remove the bread from the Dutch oven using the parchment paper.
- Transfer it to a wire rack.
- Allow it to cool for at least 45–60 minutes before slicing.
Cooling is important because the crumb continues to set after the bread leaves the oven. Cutting too early can make the interior appear gummy.
Step 11: Serve and Enjoy
Once cooled sufficiently, slice the loaf with a serrated bread knife.
Serve it plain, spread with softened butter, or brush warm slices with garlic butter for extra flavor.
⭐ Best Tips for Perfect Garlic Herb Bread
Measure the Flour Carefully
Too much flour can make the loaf dry and dense. Weighing the flour is the most reliable method.
Use the Right Water Temperature
Lukewarm water supports yeast activity without exposing it to excessive heat.
Give the Dough Enough Time
Long fermentation develops flavor and helps create the airy interior associated with artisan bread.
Don’t Overwork the Dough
This recipe does not require extensive kneading. A few gentle folds during shaping are sufficient.
Preheat the Dutch Oven
A hot pot helps the bread rise and develop a strong crust.
Score Before Baking
A shallow slash provides an expansion point and creates an attractive rustic finish.
Add Fresh Herbs Carefully
Chop rosemary and thyme finely so they are easier to distribute throughout the dough.
Avoid Excess Flour During Shaping
Use just enough flour to handle the sticky dough. Too much can leave dry patches and make the crust floury.
Cool the Bread Completely
Allowing the loaf to cool before slicing helps prevent a gummy interior.
🌿 Best Ingredient Options
| Ingredient | Alternative | Flavor or Texture |
| Bread flour | All-purpose flour | Slightly softer crumb |
| Fresh rosemary | Dried rosemary | More concentrated herbal flavor |
| Fresh thyme | Italian seasoning | Balanced mixed-herb flavor |
| Fresh garlic | Roasted garlic | Sweeter, milder garlic flavor |
| Olive oil | Melted butter | Richer buttery flavor |
| Instant yeast | Active dry yeast | Works with appropriate activation |
| Fine salt | Sea salt | Similar seasoning effect |
| Plain water | Part water and part milk | Softer, richer crumb |
If using active dry yeast, dissolve it in some of the lukewarm water and allow it to stand for approximately 5–10 minutes before mixing. Follow the yeast package instructions.
🔄 Recipe Variations
1. Cheesy Garlic Herb Bread
Add ¾ cup (85 g) of shredded Parmesan, mozzarella, or cheddar to the dough. Fold it in gently before the long rise.
Cheese can increase browning, so watch the crust closely during the final baking stage.
2. Rosemary Olive Oil Bread
Increase the rosemary to 1½ tablespoons and add an extra teaspoon of olive oil. This variation pairs especially well with soups and Mediterranean-inspired meals.
3. Roasted Garlic Bread
Replace the minced garlic with 4–6 cloves of roasted garlic, mashed into a paste. Roasted garlic provides a sweeter, more mellow flavor.
4. Parmesan Herb Bread
Add ¼–½ cup of finely grated Parmesan to the dough and sprinkle a little extra over the surface before baking.
5. Italian Herb Bread
Replace the rosemary and thyme with 1–2 teaspoons of dried Italian seasoning. Add a small pinch of garlic powder for a stronger savory flavor.
6. Sun-Dried Tomato Garlic Bread
Add ⅓ cup of drained, chopped sun-dried tomatoes to the dough. Pat them dry before mixing to avoid introducing excess oil or moisture.
7. Garlic Butter Crust Bread
After baking, brush the hot crust lightly with melted butter mixed with minced parsley and a small amount of garlic.
This gives the loaf a richer finish, although the crust will soften slightly as the butter absorbs.
8. Whole-Wheat Herb Bread
Replace up to 1 cup of the white flour with whole-wheat flour. You may need to add a little extra water because whole-wheat flour absorbs more liquid.
The resulting loaf will be heartier and denser than the original.
🍽️ What to Serve With Garlic Herb Bread
| Dish | Why It Pairs Well |
| Tomato soup | The crusty bread is perfect for dipping |
| Creamy chicken soup | Complements the rich, savory broth |
| Beef stew | Absorbs the flavorful gravy |
| Creamy garlic chicken pasta | Echoes the garlic and herb flavors |
| Roasted chicken | Makes a satisfying side dish |
| Fresh tomato salad | Balances the warm bread with freshness |
| Baked lasagna | Works beautifully with tomato sauce and cheese |
| Olive oil and balsamic vinegar | Creates a simple dipping option |
| Scrambled eggs | Makes a delicious breakfast or brunch |
| Cheese and olive platter | Perfect for a casual appetizer board |
Serving suggestion: Cut the loaf into thick slices and serve warm with softened butter or a small bowl of olive oil mixed with herbs.
⏰ Make-Ahead Instructions
Prepare the Dough the Night Before
- Mix the dough according to the recipe.
- Cover the bowl tightly.
- Allow it to ferment overnight at a suitable room temperature.
- Shape and bake the loaf the following day.
Because the dough contains very little yeast and rises slowly, it is convenient for overnight preparation.
Prepare the Dough in Advance
If your kitchen is warm and the dough is likely to rise too quickly, refrigerate it after mixing. Cold fermentation slows yeast activity and can help develop flavor.
When ready to bake, allow enough time for the dough to warm slightly and become active before shaping.
Bake Ahead for a Gathering
Bake the loaf on the day you plan to serve it for the crispest crust. If you must bake it earlier, cool completely and store it in a paper bag or bread box at room temperature.
Reheat briefly in the oven to refresh the crust.
🧊 Storage Instructions
Room-Temperature Storage
- Allow the loaf to cool completely.
- Store it in a bread box or paper bag at room temperature.
- Keep it away from direct sunlight and excessive moisture.
- Enjoy within 2–3 days for the best texture.
A paper bag helps preserve the crust better than a sealed plastic bag, although the bread may become stale sooner.
Refrigerator Storage
Refrigeration is generally not recommended for plain bread because it can make the crumb stale more quickly.
Store the loaf at room temperature if you plan to eat it within a few days. Freeze any bread you want to keep longer.
❄️ Freezing Instructions
This rustic bread freezes well, making it easy to enjoy homemade bread whenever you want.
Freeze the Whole Loaf
- Allow the bread to cool completely.
- Wrap it tightly in plastic wrap or foil.
- Place it in a freezer-safe bag.
- Label and freeze for up to 3 months for best quality.
Freeze Individual Slices
- Slice the cooled loaf.
- Place parchment paper between slices if desired.
- Transfer the slices to a freezer-safe bag.
- Freeze flat for convenient storage.
Individual slices can be reheated directly from frozen.
How to Thaw and Refresh
For a whole loaf, thaw it at room temperature while wrapped. Then remove the wrapping and heat it in a 350°F (175°C) oven for approximately 8–12 minutes to refresh the crust.
For individual slices, toast them directly from frozen or warm them in the oven until heated through.
🔥 Reheating Instructions
Oven Method
- Preheat the oven to 350°F (175°C).
- Place the bread directly on the oven rack or on a baking sheet.
- Heat for approximately 8–12 minutes.
- Remove once the crust feels crisp and the center is warm.
If the loaf is already sliced and feels dry, wrap it loosely in foil before reheating.
Air Fryer Method
- Preheat the air fryer to 320°F (160°C).
- Place one or two slices in the basket.
- Heat for 2–4 minutes, checking frequently.
Air fryers vary, so avoid leaving thin slices unattended.
Garlic Butter Toast
- Slice the bread approximately ½–¾ inch thick.
- Spread with softened garlic butter.
- Bake at 375°F (190°C) for 5–8 minutes, or until the edges are golden.
For extra color, broil briefly at the end while watching carefully.
⚠️ Common Mistakes to Avoid
| Mistake | How to Avoid It |
| Dough is too dry | Measure flour accurately and avoid adding unnecessary extra flour |
| Dough does not rise | Check the yeast’s freshness and use lukewarm water |
| Dough becomes overly sticky | Use lightly floured hands and a scraper rather than adding large amounts of flour |
| Bread is dense | Allow sufficient fermentation and handle the dough gently |
| Crust is pale | Bake uncovered long enough for the surface to brown |
| Crust burns before the center cooks | Reduce the temperature slightly and continue baking |
| Bread sticks to the Dutch oven | Use parchment paper and carefully lower the dough into the pot |
| Loaf spreads too much | Shape it with a little surface tension and avoid excessive proofing |
| Interior is gummy | Bake fully and cool for at least 45–60 minutes before slicing |
| Garlic flavor becomes too strong | Reduce the garlic or use roasted garlic |
| Herbs clump together | Chop them finely and mix them evenly into the dough |
| Crust becomes soft during storage | Avoid sealing the bread while warm and refresh it in the oven before serving |
📊 Nutrition Estimate
The following values are approximate estimates per serving, assuming one loaf is divided into 10 slices.
| Nutrient | Estimated Amount Per Slice |
| Calories | 150–190 kcal |
| Protein | 4–6 g |
| Total Fat | 2–4 g |
| Saturated Fat | Less than 1 g |
| Carbohydrates | 28–35 g |
| Fiber | 1–2 g |
| Sugars | Less than 1 g |
| Sodium | 250–400 mg |
Actual values depend on the flour used, slice size, amount of salt, and optional toppings. Adding cheese or garlic butter will increase the calorie and fat content.
❓ Frequently Asked Questions
Can I make this garlic herb bread without a Dutch oven?
Yes. Place the shaped dough on a parchment-lined baking sheet and bake in a preheated oven. For a crustier loaf, place a separate oven-safe pan of hot water on the lower rack during the initial baking stage, provided your oven manufacturer permits this method.
The crust may differ slightly from bread baked in a covered Dutch oven.
Why does the dough need to rise overnight?
A long, slow fermentation allows the yeast to develop flavor and create air pockets in the dough. It also makes this recipe convenient because most of the rising happens while you’re doing other things.
Can I knead the dough instead of using the no-knead method?
Yes, but extensive kneading is not necessary for this recipe. Gentle mixing and sufficient fermentation are generally enough to develop the dough’s structure.
Can I use dried herbs instead of fresh herbs?
Absolutely. Use approximately 1 teaspoon of dried rosemary and ½ teaspoon of dried thyme to start, then adjust to taste.
Dried herbs have a more concentrated flavor than fresh herbs, so avoid substituting them in equal volumes without considering their strength.
Can I add cheese to the dough?
Yes. Parmesan, cheddar, and mozzarella all work well. Add approximately ½–¾ cup of shredded cheese and distribute it evenly throughout the dough.
Why is my bread crust not crispy?
The bread may have been underbaked, stored while warm, or sealed in a plastic bag that trapped moisture. Bake until deeply golden, cool on a wire rack, and refresh in the oven before serving if necessary.
How do I know when the bread is fully baked?
The crust should be deep golden brown, and the center should reach approximately 200–210°F (93–99°C). The loaf should feel firm rather than doughy.
Can I make this recipe with whole-wheat flour?
Yes. Replace up to one-third of the white flour with whole-wheat flour for a heartier loaf. You may need slightly more water, and the finished bread will be denser.
Can I prepare the dough in the refrigerator?
Yes. Refrigeration slows fermentation and is useful when you want to prepare the dough in advance. Allow extra time for the dough to become active before shaping and baking.
How long does homemade garlic herb bread last?
It generally keeps well for 2–3 days at room temperature when stored properly. Freeze it if you want to preserve it for longer.
Can I freeze the baked loaf?
Yes. Cool the bread completely, wrap it tightly, and freeze for up to 3 months for best quality. Thaw and refresh in the oven before serving.
What herbs work best in this recipe?
Rosemary and thyme are excellent choices. Parsley, oregano, and Italian seasoning can also be used, depending on your preferred flavor.
🥖 Final Thoughts
This Rustic Garlic Herb Dutch Oven Bread is a delicious way to bring bakery-style bread into your own kitchen. Its golden, crackly crust, soft interior, and fragrant garlic and herb flavor make it a wonderful accompaniment to everything from creamy pasta and hearty soups to roasted meats and fresh salads.
The key to a beautiful loaf is giving the dough enough time to ferment, handling it gently, and baking it in a thoroughly preheated Dutch oven. With a little patience and a few simple ingredients, you’ll have a rustic homemade bread that’s just as inviting for everyday meals as it is for special gatherings.