
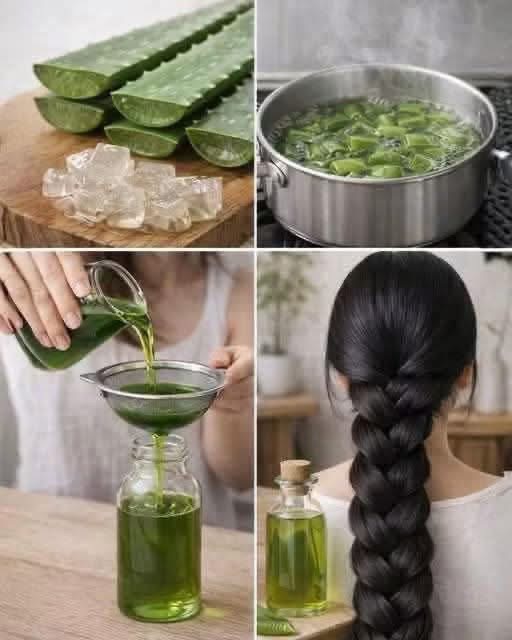
Aloe vera is a popular ingredient in natural hair care because its gel is rich in water and can leave the hair feeling softer, smoother, and more conditioned. A simple aloe vera treatment can be especially appealing for dry, frizzy, or easily irritated hair.
However, it is important to keep expectations realistic. Aloe vera cannot override genetic hair-growth patterns or instantly make hair dramatically thicker. It may help improve the feel, hydration, and manageability of the hair, while reducing the dryness and friction that can contribute to breakage.
One important safety adjustment to the viral DIY method is storage. Homemade, water-containing hair products can become contaminated with bacteria or fungi when they are not properly preserved. The FDA specifically warns that water, raw ingredients, poor storage, and ineffective preservation can contribute to microbial contamination in cosmetics.
Recipe Overview
| Category | Details |
| Preparation Time | 10 minutes |
| Cooking Time | 15–20 minutes |
| Application Time | 30–45 minutes |
| Total Time | About 1 hour |
| Servings | 1–2 applications |
| Best For | Dry, frizzy, coarse, or easily tangled hair |
| Main Ingredient | Fresh aloe vera gel |
| Treatment Type | Pre-shampoo hair and scalp treatment |
| Difficulty | Easy |
Why You’ll Love This Aloe Vera Hair Treatment
- Adds lightweight hydration to dry-feeling hair.
- Helps improve softness and shine.
- Can make hair easier to detangle.
- Works well as a pre-shampoo treatment.
- Simple ingredients with no complicated equipment.
- Customizable for different hair types.
- Can be used as an occasional scalp-and-hair treatment rather than a daily product.
Important: Aloe vera is a cosmetic hair-care ingredient, not a proven cure for dandruff, hair loss, or scalp disease.
Ingredients
Aloe Vera Hair Rinse
| Ingredient | Amount | Purpose |
| Fresh aloe vera leaves | 2 medium leaves | Provides aloe gel |
| Distilled water | 2 cups (480 ml) | Creates the rinse |
| Optional rosemary essential oil | 1–2 drops | Adds fragrance; optional |
Aloe Vera Oil Treatment
For a safer homemade oil treatment, rather than storing fresh aloe vera inside oil for weeks, prepare the treatment fresh each time.
| Ingredient | Amount |
| Fresh aloe vera gel | 2 tablespoons |
| Coconut, olive, or jojoba oil | 2 tablespoons |
| Optional rosemary essential oil | 1 drop |
Note: Essential oils can irritate sensitive skin. If your scalp is reactive, leave them out. Natural ingredients can still cause irritation or allergic reactions.
Step-by-Step Instructions
Part 1: Prepare the Aloe Vera
- Wash the aloe vera leaves thoroughly.
- Stand the leaves upright in a glass for about 10–15 minutes so the yellow latex can drain.
- Cut away the spiky edges.
- Slice the leaf open lengthwise.
- Scoop out the clear inner gel, avoiding as much of the green outer skin and yellow latex as possible.
- Rinse the gel under cool running water.
The yellow latex contains compounds that can be irritating to some people, so using the clear inner gel is preferable for a homemade hair treatment.
Part 2: Make the Aloe Vera Hair Rinse
- Place the cleaned aloe gel and 2 cups distilled water into a blender.
- Blend briefly until the mixture is relatively smooth.
- Transfer it to a small saucepan.
- Heat gently for approximately 5–10 minutes rather than aggressively boiling it.
- Allow it to cool completely.
- Strain through a clean fine-mesh sieve or cheesecloth.
- Transfer only the amount you intend to use immediately into a clean container.
How to Apply
- Shampoo your hair as usual.
- Pour or spray the aloe rinse over the scalp and hair.
- Gently massage the scalp with your fingertips.
- Work the rinse through the lengths and ends.
- Leave it on for 5–10 minutes.
- Rinse thoroughly with cool or lukewarm water.
- Follow with your normal conditioner if your hair needs additional moisture.
Part 3: Make the Fresh Aloe Oil Treatment
This version is best made immediately before use.
- Add 2 tablespoons fresh aloe gel to a small bowl.
- Add 2 tablespoons coconut, olive, or jojoba oil.
- Mix thoroughly until combined.
- If desired, add 1 drop rosemary essential oil.
- Apply a small amount to the scalp.
- Massage gently for several minutes.
- Distribute the remaining mixture through the hair lengths.
- Cover the hair with a shower cap.
- Leave on for approximately 20–30 minutes.
- Shampoo thoroughly to remove the oil.
If your scalp becomes itchy, red, burning, or uncomfortable, wash the treatment out and discontinue use.
Best Tips
1. Use the clear inner aloe gel
Avoid deliberately including large amounts of the green leaf or yellow latex. The goal is to use the clear inner gel.
2. Don’t overheat aloe
A gentle warming step is sufficient. Prolonged high heat isn’t necessary for a simple hair treatment.
3. Start with a small amount
Too much aloe or oil can leave some hair types feeling coated or greasy.
4. Don’t scratch the scalp
Massage gently with your fingertips rather than using your fingernails.
5. Patch test first
Apply a small amount to a small area of skin and observe for irritation before using it extensively. Contact dermatitis can occur when a substance irritates the skin or triggers an allergic reaction.
6. Don’t assume “natural” means irritation-free
Aloe, essential oils, fragrances, and other botanical ingredients can still cause skin reactions in some people.
Best Ingredient Options
For Dry Hair
Jojoba oil or olive oil can provide a richer-feeling pre-shampoo treatment.
For Fine Hair
Use a smaller amount of oil and focus the aloe treatment on the lengths rather than heavily coating the roots.
For Coarse Hair
A slightly richer treatment with coconut or olive oil may feel more conditioning.
For Sensitive Scalps
Use plain aloe gel without essential oils or fragrance.
Recipe Variations
Aloe + Coconut Oil Treatment
Mix fresh aloe gel with coconut oil for a richer pre-shampoo treatment.
Aloe + Jojoba Oil Treatment
Jojoba oil provides a lighter texture that can be preferable for finer hair.
Simple Aloe Hair Rinse
Use only freshly prepared aloe and distilled water when you want the lightest option.
Aloe + Conditioner Treatment
Mix a small amount of fresh aloe gel into your regular conditioner immediately before application rather than storing the mixture.
What to Use It With
For a complete hair-care routine, pair the treatment with:
- A gentle shampoo
- A moisturizing conditioner
- A wide-tooth comb
- A microfiber towel or soft T-shirt
- A lightweight leave-in conditioner if needed
- Heat protection when using hot styling tools
If persistent dandruff, scalp redness, scaling, pain, or significant hair loss is present, a homemade aloe treatment shouldn’t replace appropriate medical evaluation.
Make-Ahead Instructions
For safety, don’t prepare a large batch of homemade aloe-water treatment for a week of use.
Water-containing homemade cosmetics can support microbial growth, particularly without a properly tested preservative system. The FDA notes that contaminated water or raw materials and ineffective preservation can allow microorganisms to grow.
The safest approach is to make a small amount immediately before use.
The aloe-and-oil treatment should also be mixed fresh rather than storing fresh aloe in oil for weeks.
Storage
Fresh Aloe Rinse
For the safest homemade approach, use immediately and discard leftovers.
If you choose to refrigerate a small leftover amount, refrigeration slows microbial growth but does not make an unpreserved homemade cosmetic reliably shelf-stable. If the mixture develops an unusual smell, color, texture, or visible growth, discard it immediately.
Aloe Oil Treatment
Don’t rely on the claim that fresh-aloe-infused oil can safely remain at room temperature for one month. Fresh plant material introduces water and can complicate the safety and stability of a homemade oil preparation.
For best safety, make only what you need for one application.
Reheating
There is no need to reheat the finished treatment.
If the mixture has been refrigerated, allow it to reach a comfortable temperature naturally before applying. Never apply a hot preparation directly to the scalp.
Freezing
Freezing isn’t necessary for this recipe.
Because homemade aloe preparations lack a professionally tested preservation system, making small fresh batches is preferable to freezing and repeatedly thawing portions.
Common Mistakes to Avoid
❌ Using the whole aloe leaf
The green outer portion and yellow latex aren’t necessary for this treatment.
❌ Leaving aloe on the scalp overnight
Longer isn’t automatically better. Start with 20–30 minutes for the oil treatment.
❌ Adding too much essential oil
More essential oil does not mean better results and may increase irritation.
❌ Storing homemade aloe water for a week
A water-based homemade cosmetic can become contaminated.
❌ Expecting instant hair growth
Aloe vera cannot change your genetic hair-growth limits or guarantee thicker hair.
❌ Using it on an already irritated scalp
If your scalp is inflamed, broken, painful, or developing a rash, stop experimenting with DIY products and consider getting professional advice.
Nutrition Estimate
This is a topical hair treatment, so a conventional nutrition panel isn’t meaningful.
| Nutrient | Amount |
| Calories | Not applicable |
| Protein | Not applicable |
| Carbohydrates | Not applicable |
| Fat | Not applicable |
| Fiber | Not applicable |
| Sugar | Not applicable |
Frequently Asked Questions
Does aloe vera make hair grow faster?
There isn’t enough evidence to say that homemade aloe vera treatments can dramatically accelerate hair growth. They may help condition the hair and reduce dryness or breakage, which can make hair appear healthier.
Can aloe vera make hair thicker?
Aloe vera cannot permanently increase the number of hair follicles. It may make hair feel smoother or better conditioned, but claims of instantly creating ultra-thick hair should be treated skeptically.
Is aloe vera good for dry hair?
It can be useful as a hydrating and conditioning ingredient, particularly when the hair feels dry or rough.
Can I use aloe vera on my scalp?
Some people tolerate aloe well, but scalp reactions are possible. Perform a patch test first and discontinue use if you experience itching, redness, burning, or a rash.
Can I leave aloe vera in my hair overnight?
It’s better to start with a shorter treatment of around 20–30 minutes. If your scalp becomes irritated, rinse immediately.
Can I add rosemary essential oil?
You can, but it is completely optional. Because essential oils can irritate sensitive skin, plain aloe is the better starting point for people with reactive scalps.
How often should I use an aloe hair treatment?
Start with once a week and see how your hair and scalp respond. If your hair becomes coated, greasy, dry, or irritated, reduce the frequency or stop using it.
Can aloe vera cure dandruff?
No. Persistent dandruff may have an underlying scalp condition that requires appropriate treatment. Aloe may feel soothing for some people, but it shouldn’t be presented as a cure.
Final Thoughts
This Homemade Aloe Vera Hair Rinse & Oil Treatment is a simple way to incorporate aloe into a natural hair-care routine. Used appropriately, it can help hair feel softer, smoother, and more hydrated, especially when dryness and frizz are concerns.
The most important part is keeping the recipe simple and hygienic. Fresh aloe treatments should be made in small quantities and used promptly rather than stored for long periods. Homemade water-based cosmetics can become contaminated without proper preservation, so longer shelf-life claims should be treated cautiously.
And remember: healthy hair comes from an overall routine—gentle cleansing, adequate conditioning, minimizing unnecessary heat and chemical damage, and addressing persistent scalp or hair-loss problems appropriately.