
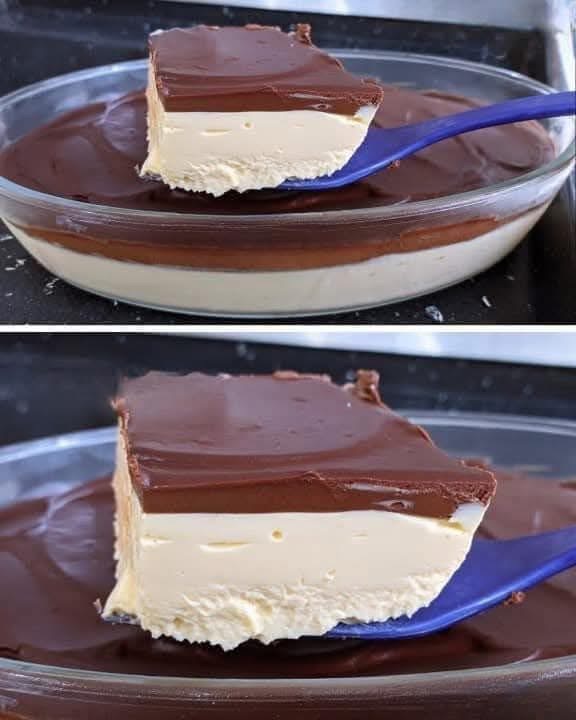
Creamy, silky, and incredibly easy to make, this No-Bake Chocolate Cream Dessert features a thick layer of smooth vanilla cream topped with a rich, glossy chocolate layer. The contrast between the cool white filling and deep chocolate topping makes every slice look elegant while requiring no oven.
From the image, the dessert appears to have a firm, mousse-like white base and a smooth chocolate topping that slices beautifully. It’s perfect for when you want an easy no-bake dessert recipe with a rich, creamy texture and minimal effort.
⸻
🍰 Recipe Overview
| Category | Details |
| Recipe Name | No-Bake Chocolate Cream Dessert |
| Prep Time | 20 minutes |
| Chill Time | 4–6 hours |
| Total Time | About 6 hours |
| Servings | 10–12 |
| Pan Size | 9-inch round or 8×8-inch dish |
| Difficulty | Easy |
| Method | No-Bake |
| Texture | Creamy, silky, firm |
| Flavor | Vanilla cream & chocolate |
⸻
❤️ Why You’ll Love This Dessert
- 🍫 Rich chocolate topping with a smooth, glossy finish.
- 🤍 Thick, creamy vanilla layer underneath.
- ❄️ No oven required.
- ⏰ Perfect make-ahead dessert.
- 🥄 Simple ingredients and easy preparation.
- 🎉 Great for holidays, parties, potlucks, and family gatherings.
- ✨ Looks elegant despite being incredibly simple to prepare.
⸻
🛒 Ingredients
🤍 Creamy Vanilla Layer
| Ingredient | Amount |
| Cream cheese, softened | 8 oz (225 g) |
| Sweetened condensed milk | 1 can (14 oz / 397 g) |
| Heavy whipping cream | 1½ cups (360 ml) |
| Powdered sugar | ½ cup (60 g) |
| Vanilla extract | 1 tsp |
| Unflavored gelatin | 1 packet (about 7 g) |
| Cold water | 3 tbsp |
Tip: The gelatin helps the creamy layer hold its beautiful shape when sliced.
⸻
🍫 Chocolate Topping
| Ingredient | Amount |
| Semi-sweet or milk chocolate | 6 oz (170 g) |
| Heavy cream | ¾ cup (180 ml) |
| Unsalted butter | 1 tbsp |
| Vanilla extract | ½ tsp, optional |
⸻
👩🍳 Step-by-Step Instructions
1. Prepare the Creamy Base
Place the softened cream cheese in a large mixing bowl.
Beat for approximately 2–3 minutes, until completely smooth.
Add the powdered sugar and vanilla.
Beat again until creamy and lump-free.
⸻
🥛 2. Add the Condensed Milk
Gradually pour in the sweetened condensed milk while mixing on low speed.
Once incorporated, increase the speed slightly and beat until smooth.
Scrape down the sides of the bowl as needed.
⸻
☁️ 3. Whip the Cream
In a separate chilled bowl, whip the heavy cream until medium-stiff peaks form.
Don’t overwhip it.
The cream should be thick enough to hold its shape but still look smooth.
⸻
✨ 4. Combine the Filling
Gently fold the whipped cream into the cream cheese mixture.
Fold in several additions rather than stirring aggressively.
This keeps the filling light and airy.
⸻
🥄 5. Prepare the Gelatin
Place the gelatin in 3 tablespoons cold water.
Let it stand for approximately 5 minutes to bloom.
Warm it gently until completely dissolved. Do not boil.
Allow it to cool slightly, then slowly mix it into the cream filling.
⸻
❄️ 6. Chill the Cream Layer
Lightly grease or line your serving dish.
Pour the cream mixture into the dish.
Smooth the surface with an offset spatula.
Refrigerate for at least 1½–2 hours, or until the layer is firm enough to support the chocolate topping.
⸻
🍫 7. Make the Chocolate Topping
Place the chopped chocolate in a heatproof bowl.
Heat the heavy cream in a small saucepan until steaming but not boiling.
Pour the hot cream over the chocolate.
Let it sit for 2 minutes.
Add the butter and gently stir until completely smooth and glossy.
Add vanilla if desired.
⸻
🌡️ 8. Cool the Chocolate
Allow the chocolate mixture to cool to lukewarm or room temperature.
This is important.
If the chocolate is too hot, it can melt the creamy layer underneath.
⸻
🍫 9. Add the Chocolate Layer
Pour the cooled chocolate mixture gently over the chilled cream layer.
Tilt the dish slightly or use a spatula to spread the chocolate evenly.
Try not to press the chocolate into the cream.
⸻
❄️ 10. Chill Until Set
Return the dessert to the refrigerator.
Chill for at least 4 hours, preferably overnight.
The chocolate will firm up while the creamy layer becomes perfectly sliceable.
⸻
🔪 11. Slice and Serve
For clean slices, dip a sharp knife into hot water.
Dry it thoroughly, then slice the dessert.
Repeat between cuts.
Serve chilled.
⸻
⭐ Best Tips for Perfect Results
Use room-temperature cream cheese
Cold cream cheese can leave small lumps in the filling.
Don’t overwhip the cream
Stop as soon as medium-stiff peaks form.
Let the chocolate cool
This is one of the most important steps. Hot ganache can soften or melt the cream layer.
Chill long enough
Four hours is the minimum recommended chilling time, but overnight produces an even firmer dessert.
Use good-quality chocolate
The chocolate topping is prominent, so a good-quality chocolate makes a noticeable difference.
Cut with a warm knife
This creates smooth, bakery-style slices like the ones shown in the image.
⸻
🍫 Best Ingredient Options
Chocolate
Use semi-sweet chocolate for a balanced flavor or milk chocolate for a sweeter dessert.
Dark chocolate works beautifully if you prefer a less-sweet topping.
Cream Cheese
Full-fat block cream cheese provides the firmest and creamiest texture.
Heavy Cream
Use cold heavy whipping cream with at least 30% fat for the best volume.
Sweetened Condensed Milk
Don’t substitute evaporated milk—the two products have very different sweetness and consistency.
⸻
🍓 Recipe Variations
Chocolate Cheesecake Version
Add 2 tbsp unsweetened cocoa powder to the cream layer for a chocolate cheesecake-style filling.
Strawberry Chocolate Dessert
Add a thin layer of sliced strawberries between the cream and chocolate.
Peanut Butter Chocolate Version
Beat ½ cup creamy peanut butter into the cream cheese mixture.
Mocha Version
Add 1 tsp instant espresso powder to the chocolate topping.
Mint Chocolate Version
Add ¼–½ tsp peppermint extract to the chocolate layer.
Coconut Chocolate Version
Sprinkle ½ cup toasted coconut over the chocolate topping.
Caramel Chocolate Version
Drizzle a few tablespoons of caramel sauce over the white cream layer before adding the chocolate.
⸻
🍓 What to Serve With It
This rich dessert pairs beautifully with:
- Fresh strawberries
- Raspberries
- Blueberries
- Whipped cream
- Vanilla ice cream
- Fresh mint
- Espresso
- Coffee
- Cappuccino
- Hot tea
A few fresh berries on each plate provide a nice contrast to the creamy chocolate flavor.
⸻
⏰ Make-Ahead Instructions
This is an excellent make-ahead dessert.
Prepare the entire dessert the day before serving and keep it covered in the refrigerator.
Overnight chilling allows the cream layer to firm up and gives the chocolate topping enough time to set completely.
For parties and holidays, this makes an especially convenient dessert because it can be finished well before guests arrive.
⸻
🧊 Storage
Keep the dessert refrigerated in a covered container.
Best quality: approximately 3–4 days.
Because the dessert contains dairy and cream, don’t leave it sitting at room temperature for extended periods.
⸻
🔥 Reheating
This dessert is designed to be served chilled.
Do not reheat it.
If the chocolate topping becomes very firm, simply allow the dessert to sit at room temperature for approximately 5–10 minutes before slicing.
⸻
❄️ Freezing
This dessert can be frozen, although the cream layer may become slightly different in texture after thawing.
For best results, freeze it tightly covered for up to 1 month.
Thaw overnight in the refrigerator.
Do not thaw it at room temperature for several hours.
⸻
⚠️ Common Mistakes to Avoid
Pouring hot chocolate over the cream
Always cool the chocolate topping first.
Not softening the cream cheese
This can result in a lumpy filling.
Overwhipping the cream
Overwhipped cream can become grainy and difficult to fold smoothly.
Not using enough chilling time
The dessert needs sufficient time to become firm enough to slice.
Cutting immediately after removing from the freezer
Allow frozen dessert to thaw gradually in the refrigerator for the best texture.
Using a watery chocolate topping
Follow the chocolate-to-cream ratio carefully so the topping becomes firm enough to slice.
⸻
📊 Nutrition Estimate
Approximate values per serving, assuming 12 servings:
| Nutrient | Estimated Amount |
| Calories | 390–450 kcal |
| Carbohydrates | 38–45 g |
| Protein | 5–7 g |
| Fat | 25–30 g |
| Saturated Fat | 15–18 g |
| Sugar | 30–36 g |
| Fiber | 1–2 g |
| Sodium | 180–240 mg |
Nutrition values are estimates and vary according to the chocolate, cream cheese, and amount of condensed milk used.
⸻
❓ Frequently Asked Questions
Can I make this dessert without gelatin?
Yes, but the cream layer will be softer. If you omit gelatin, chill the dessert longer and use full-fat cream cheese with well-whipped heavy cream.
Can I use Cool Whip instead of heavy cream?
Yes. Prepared whipped topping can be folded into the cream cheese mixture for a convenient version.
Why did my chocolate topping melt the cream layer?
The chocolate was probably too hot when added. Let the ganache cool until lukewarm before spreading it over the chilled filling.
Can I use dark chocolate?
Absolutely. Dark chocolate creates a richer, less-sweet contrast with the sweet vanilla cream.
How long should this dessert chill?
Allow at least 4 hours. For the cleanest slices, overnight is ideal.
Can I make this in a square dish?
Yes. An 8×8-inch dish will create a thicker dessert, while a 9×9-inch dish produces slightly thinner layers.
How do I get clean slices?
Use a sharp knife dipped briefly in hot water and dried before each cut.
⸻
✨ Final Thoughts
This No-Bake Chocolate Cream Dessert is the perfect combination of silky vanilla cream and rich chocolate ganache. The creamy white center and glossy chocolate topping make it look impressive, while the simple preparation makes it an ideal easy dessert recipe for busy days, holidays, parties, and family gatherings.
Prepare it the night before, let the layers chill until perfectly firm, then slice it with a warm knife for those beautiful clean layers. 🍫🤍✨